The hip hop rhythm I was using had a double kick drum and the second one was showing up on the top line. I couldn't see a menu option for changing the display of mapped instruments.
Assuming the first kick is C1 in the Piano Roll/Event List, and appearing in the Score, in the
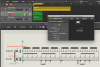
Mapped Instrument change the Kick 1 Rel. Pos. value to up or +0.5. It should now appear in the first space of the drum staff in Score. This is where a kick should appear in notation. Logic's default kick notation is on the bottom line which is really Kick 2/B0. In this case there's no need to change the Rel. Pos. of Kick 2 in the
Mapped Instrument.
Kicks 1 and 2 should now appear as expected in the Score editor.
There also was a tambourine and another instrument which sounded but did not show up in the #Drums display.
Adding in a Tamborine and other percussion into drum kit notation is visually a mess. It'b better to place the Tamborine on a separate single line drum staff style which you can create by duplicating the
#Drum staff style. In the
Staff Style window, change the
Clef to
Drum.1. In the new Percussion or Tamborine
Mapped Instrument object, move the tambourine into the HiHat
Group.
You can assigned this second
Mapped Instrument a second instance of Drummer.
In my case, it was assigned to a custom EXS24 instrument. Hi Hat notes from an EXS24 Rock Kit were copied and pasted into a new empty EXS24 on a separate track. In the editor of the new EXS24 instrument, the Lo Hi Key Range was changed from F#2 to F#1 for both values. The result is what you see in the newer screen grab above.
There are probably other ways to go about this but the steps above do work here.