Logic Pro 9 virtual instrument bypass via external controller

Eduà

Logician
Hi all,
is there anyone that could explain me how to assign a bypass function of a virtual instrument in Logic Pro 9 to an external midi controller knob or button? That would help me saving a lot of cpu while playing live, without having to use the trackpad and looking at the computer monitor. As for the inserts of the channel strip I know how to do the thing - using midi learn in Controller Assignments tab - but I can't figure it out if trying to obtain the same thing on the virtual instrument itself.

All the Best,
Eduà

P.S.
One may argue why I am not using MainStage for playing live. The reason is that it crashes too easily. When I buy a new Mac I will try MainStage 3, but as for now I stay with Logic 9.
 
I don't know if this is possible via Controller Assignments. But you can do it in the Environment, the instrument counts as the first plugin slot.
 
Upvote 0
Hi Peter,
thank you for your reply.
I don't know if this could be useful to me so please, could you explain me step by step how do you manage to do this in the environment?
The matter is that Controller Assignments always operates on the subsequent slot insert: if I select the first one (the instrument), bypass will be assigned to the second one (i.e. an equalizer) and so on. That's odd but that's why I cannot assign the midi learn to the instrument.

Best Regards
 
Upvote 0
Well, we have unlimited possibilities ;)

On the controller you can use buttons, knobs, sliders and notes, even Poly Aftertouch. But you must send either continuous values or on/off events. Momentary buttons do only work if you use them separately for the "on" and "off" state. If your controller is a keyboard with just a few control elements you may tend to use notes.

Three basic methods:

  • Controller to the Environment
    You collect the incoming events at the Physical input and cable directly to the channelstrips. Depending on the events there may be a small patch necessary to sort them out.

  • Controller to Controller Assignments
    Here you can use everything that is supported. I think you kow this system already. Controller Assignments do not talk to Environment objects, but there are some tricks to make this work.

  • Control via Logic Tracks
    If Logic is running for a song-dependent playback, you can insert small MIDI regions before each song. When the SPL passes over them, channelstrips are automatically switched.

Questions:

  1. Do you prefer one of the methods above?
  2. Which controller do you use (brand, model name)?
  3. How many channelstrips do you switch? 10 or 200?
  4. Do you play on a per-song basis or do you switch the channelstrips freely, while the music develops?
 
Upvote 0
These are useful questions to pose. Here you are the answers:

1. Well, I think that for the purpose of this thread the Controller to the Environment method seems to be the most suitable.
2. I am using a Nektar Panorama p6, a keyboard midi controller which I just bought one month ago.
http://www.nektartech.com/
It works with every midi sequencer but, as you can see, it has been created for deep integration with Reason and, more recently, Cubase and Nuendo. I hope there will be further detailed integration with Logic Pro, since I am experiencing many issues when re-opening previously saved projects.
3. I try not to exceeds 16 midi channel strips.
4. As for now, I switch the channel strips freely. If I succeed bypassing on the fly the instruments I am not using, I can work only on one project without waiting between closing and opening different projects, and without the risk that the Panorama p6 does not recall straightaway all the saved assignments when re-opening a project.
 
Upvote 0
2. I am using a Nektar Panorama p6, a keyboard midi controller which I just bought one month ago.
...
3. I try not to exceeds 16 midi channel strips.
I think we go for the pads and I'll think about a way to adress more than 12 channelstrips.

Do you use the pads in your playing?
 
Upvote 0
I am not using the 12 pads. On the keyboard monitor they are actually 16, it is possible to switch in order to control the other four, always using the "real" pads.
I was thinking, if I am not going to complicated things too much, that could be useful doing this work on a Korg nanoKey keys and leave the Panorama knobs, faders and pads to control specific instruments function on the project. I don't know if this is a good idea, you may know which solution is more practical.
One more thing, hoping not to bother you.
As you know, in order to play an instrument and listen to it, the "record" icon of its channel strip must be turned red. I do not know if I am right, but it seems that keeping many instruments record-enabled, even when bypassed, it affects considerably the cpu. If so, it would be worth to assign both the functions of an instrument bypass (yes/no) and record disable (yes/not) to the same key or pad, whether we choose to work on the nanoKey or the p6. If you think that record enabled tracks don't affect so much the cpu don't take into consideration this last consideration, since I do not want to steal your time.
 
Upvote 0
Pads/Buttons

You can use the virtual buttons on your keyboard screen (well, if they send MIDI out). But this makes only sense if you don't need more the 12 or 16 and only if this is a touch screen and the buttons indicate their on/off state by changing their appearance.

The Korg nanoPad would be good choice. Actually you can use any device that is good to handle and sends standard MIDI events. If you find a controller that indicates the on/off state of buttons by light or button color or by mechanical switches, we can use it also.


Other controllers

Basically you can use any MIDI hardware that sends different states about its elements. Musical instruments, foot controllers, or long ribbon controllers like the Doepfer R2M (which is a great device, by the way).

We could also use iPhone or iPad apps via OSC as long as they send Standard MIDI data. If you manage to send their data to the environment, you are in the game.


Switching possibilities

  • Toggle action
    The state of a channelstrip changes each time you press a button or pad. But unless you use a controller with toggle (latching) buttons that offers a LED or mechanical indication about it's state, you need to see Logic on a screen. Otherwise you cannot know if a channel is on or off.
  • Switching by velocity
    With velocity sensitive pads you may not always need to see the Logic screen. A soft touch could switch a channel ON and a hard touch switches it OFF. You can switch as many channelstrips as you have pads.
  • Two buttons per channelstrip
    This is a convenient method but will give you only half the number of switchable strips. On the nanoPad, the upper 8 pads would switch the channels on, the lower row switches them off. A good method if you need only 8 buttons most of the time or if your brain is able to remember easily in which bank which channelstrip lives.
It depends on your needs what you tend to use. For fast and reliable switching of just a few channels during one performance the "Two buttons" method is best. For more pads the velocity method may be ok. Be aware that not all pads are sensitive enough because many of them are built for heavy drumming. Toggle action is ok if you have always the Logic screen available. And it is the only choice if your controller does not allow another method because of too few buttons or poor pressure sensitivity

Don't worry, for our environment patch the difference isn't big. If we are smart, we talk only about a couple of objects.

What is your preference?


As you know, in order to play an instrument and listen to it, the "record" icon of its channel strip must be turned red.
Not if you cable your incoming MIDI data directly to the channelstrips. Then they play always, regardless of track selection and record state. And you can easily play instrument layers by connecting an input to more than one channelstrip. And you can turn Logics software monitoring off, which is preferable for best performance.

If you want this, please tell me.

We can switch the cabling along with your channelstrip selection. Just take care about note-offs. Holding a note while interrupting the connection delivers a wonderful MIDI hang, most desirable for infinitive drones ;) We would need a panic button in the environment.


I do not know if I am right, but it seems that keeping many instruments record-enabled, even when bypassed, it affects considerably the cpu.
Logic has two modes for bypassing. One is slower and needs less CPU, the other one is faster but does not lighten the load so much. Global setting in "Logic Pro -> Audio -> General -> Track Mute/Solo".


If so, it would be worth to assign both the functions of an instrument bypass (yes/no) and record disable (yes/not) to the same key or pad
Thanks for reminding me, I forgot the Mute button in our SysEx fader. We will add this message.

Record buttons cannot easily get switched, they are handled by Logic and it depends in which controller bank they are (for Control Surfaces). If you want to enable/disable many record buttons at once, assign all the channelstrips to one group where only "Record" is enabled. Then the record buttons go on an off when you select one Track in the group or step out of the group.

However, for live performance it is good practice not to select instrument channels. Select an audio channel or something else to avoid the automatic record activation. This if of course only possible if you use direct cabling in the environment.

---

Oh - I forgot to ask:
Why don't you use Mainstage? It is exactly built for what you want. Is it too heavy for your Mac? What we are doing here is rather special nowadays ...

---

I think we are almost through with the preparation. When you tell me which of the controlling methods you prefer and if you want direct intrument cabling we can begin to build the input section.
 
Upvote 0
I answer first to your last question, because this indeed is what lies behind my thread. As I wrote at the end of my first post:
P.S.
One may argue why I am not using MainStage for playing live. The reason is that it crashes too easily. When I buy a new Mac I will try MainStage 3, but as for now I stay with Logic 9.

That's a pity, since Mainstage it is a lot easier to use for these purposes, but this is the truth about this software and my current setup.

The pads can send midi messages but the monitor isn't touchscreen.
If you think that is ok, as I said in the previous message, I 'd rather use the nanoKey (you mentioned the nanoPad, but I would use it, if the case, for drumming). This way we will work with two external controllers connected, the Korg one and the Panorama p6.

Toggle mode would be the best one.
Supposing that bypassing instruments will sound, in auditory terms, in the same way as when we mute them, I should know by hear which instruments are bypassed and which ones are active, even if I were working without led indicators. Correct me if I am wrong.

As far as I see, reading what you say on this topic, direct cabling to the environment allows better control of the plugins and effective saving of cpu, so I would definitely go for it.
Thank you for your time.
 
Upvote 0
If you think that is ok, as I said in the previous message, I 'd rather use the nanoKey (you mentioned the nanoPad, but I would use it, if the case, for drumming).
It does not really matter which one you choose. Main difference are the layout and the size of pads. Only for the method "Two buttons per channelstrip" I would recommend the nanoPad. Otherwise it is a choice of taste.

The best controller for this job would be an array of mechanical switches.


I should know by hear which instruments are bypassed and which ones are active, even if I were working without led indicators.
Not necessarily. When you select the instruments and then start to play, the wrong sound may appear. Remembering a certain state of more than 4 control elements is hard work for the brain and not desirable for musical performance. We should reserve two buttons for special functions: Switching all instrument channels off and Panic (stopping all MIDI notes).


As far as I see, reading what you say on this topic, direct cabling to the environment allows better control of the plugins and effective saving of cpu, so I would definitely go for it.
Ok, therefore I suggested the panic button above. Direct cabling has the strong potential for MIDI hangs.

Now I'll start to design the input section.
 
Upvote 0
I am ready. Hopefully no major bugs.

We currently have:
  • Up to 32 channelstrips
  • Directly cabled in the Environment
  • Soundlayers possible (every active instrument plays)
  • Switched on and off by momentary buttons (the patch toggles)
  • All channelstrips can be turned off at once
  • Panic function for all channelstrips at once
We can add, but don't currently have:

  • Keyboard splits by channel or note pitch
  • Display for active channelstrips (currently you need to see the channels)
  • Automatic "notes off" when you disable a channelstrip
Because you don't use a dedicated controller all the time but also a keyboard, I made some restrictions regarding controller numbers. Please look at this table if you are not sure why I use or leave the following numbers.
0-84 Not used in the patch
85-116 Used for channelstrip switching
117-118 Not used in the patch yet
119 Used for "All channelstrips off"
120 Used for "All notes off" (Panic)
121-127 Not used in the patch
Unused CCs and all Notes, Pitchbend, Aftertouch and Program Changes go always to all channelstrips simultaneously, with their original channel number.

Question 1
Is all of the above ok for you?

Question 2
We cannot use our previously created patches as they are. Am I allowed to remove the "tutorial" parts from this thread and keep only our discussion, before we start making the real thing?
 
Upvote 0
Hi Peter,
I am so sorry for the delay in answering you. The matter is that I always get a notification via email when you add a new message in the thread and, since this time I did not receive anything, I thought you were still working on it.
As I checked the forum I saw you had already posted a message nine days ago.
So I apologize but, anyway, here I am.
I answer yes to both your questions and, if it is not too much work for you, I welcome the three options you mentioned.
We can add, but don't currently have:

  • Keyboard splits by channel or note pitch
  • Display for active channelstrips (currently you need to see the channels)
  • Automatic "notes off" when you disable a channelstrip

Thank you so much for your patience and competence.
 
Upvote 0
Since you agreed, I removed the first "tutorial" posts from this thread.
We'll start again from scratch ...

----------------------------------------

1. Project preparation

1.1. Make a new fresh Logic project with one instrument track, name the project "SwitchStrips".

1.2. We do not want Logic to manipulate our channelstrips. Go to the main menu "File -> Project Settings -> Audio" and disable the first two checkboxes:
Screenshot%2019.10.13%2022:06.jpg


1.3. Put small effect plugins (Sample Delay for example) into the first 15 slots of the instrument channelstrip. Set the volume to a low level.

1.4. Duplicate the track to get 3 more, identical tracks.

1.5. Load different synthesizers into the channelstrips. Your mixer should now look like this:
Screenshot%2019.10.13%2023:27.jpg


1.6. Make the whole window as narrow as possible, we won't use it often.

----------------------------------------

2. Layer "Click & Ports"

You may know that Logic tends to re-arrange your MIDI inputs if you change your hardware setup. Therefore we will take some precautions.

2.1. Open an Environment window, first deactivate the "chain" button at the top to prevent the display synchronization between windows.

2.2. Go to the layer "Click & Ports". Delete the keyboard and the monitor, just keep the "Physical Input", the "Sequencer Input" and the "MIDI Click" objects.

2.3. Create a Cable Switcher object (New -> Fader -> Specials -> Cable Switcher), in the Inspector set it's input range to 0 1. You should set the Cable Switcher's input to something your keyboard will never send. Since nothing outside of Logic knows "Fader" messages, this is a good choice. Set the input to type Fader and you are on the safe side.

2.4. Create 2 monitor objects. Name them "To Sequencer" and "To Switch Input"

2.5. Connect the incoming port of your keyboard to the Cable Switcher. In my example below the port is "WIDI-XU", in your Environment it is the port where your keyboard comes in. Cable everything else like in the screenshot. Click on the Cable Switcher to select it's second output and play some notes on the keyboard. They should appear in the second Monitor:
Screenshot%2019.10.13%2023:42.jpg

From now on all data from your keyboard will go this way, all other data leaves the Physical Input at the SUM port. With the Cable Switcher you can always decide where to send your keyboard. If the Physical Input re-organizes your ports for some reason, just cable the correct port again to the Cable Switcher and you are ready to go.

----------------------------------------

3. Layer "Switch"

3.1. Open a second environment window, create a new layer and name it "Switch". Create a Monitor object and name it "Switch Input".

3.2. Scale and arrange the two Environment windows so you can drag from the "Click & Port" to the "Switch" layer and connect the two Monitor objects:
Screenshot%2020.10.13%2000:05.jpg


If you play again a couple of notes, they appear also in the input monitor of the layer "Switch". The monitor on the "Click & Port" layer shows a short cable tail at it's first output to indicate the connection to another layer.

3.3. Save the project.

----------------------------------------

Basic preparation is done, we can start to create our patch ...
 
Upvote 0
A few words about the patch design:

We want 32 individually selectable instrument channelstrips. A single keyboard split by channel and by key pitch should be provided for each channel. Furthermore, we want an "All Strips Off" and a "Panic"function. And we want to automatically terminate all notes whenever a channelstrip gets deactivated.

"By Channel" is the better keyboard split because it allows to send common messages like PitchWheel, ModWheel and Sustain only to one part of the split. This way you can for example hold a lower chord but use modulation and pitch in the upper range for solo notes. I have added this function, but to use it, it is necessary that either your keyboard is able to send notes on different channels or you create such channels yourself in the Logic Environment or in another software you might use.

I have not included the possibility to send ModWheel, PitchWheel and Sustain on different channels and to different channelstrips. If you need this, we have to modify the patch.

For initial construction we will first work with one channelstrip, later with 4 of them. The patch can easily be expanded to max. 32 channels just by duplicating and cabling a Macro that sits in front of each channelstrip.
 
Upvote 0
4. Preparing control messages

For the begin we need 6 buttons on your keyboard or on another controller. They must be momentary, not toggle buttons. For strip selection toggle buttons (latching) would be better, but since you don't have this type I designed the patch for momentary buttons.

4.1.
Configure 4 buttons (pads) on your keyboard to send Control Change number 85, 86, 87 and 88. (CC 85-88). When pressed they must send a value greater than 0 and when released they must send 0. The MIDI channel does not matter. These are our "Selection Buttons", used to select channelstrips. Finally we can have up to 32 of them.

4.2. Configure 2 additional buttons to send CC 119 and CC 120. Again, only momentary buttons, release sends value 0 and press sends something else. Channel does not matter. You may want to choose two buttons somewhere on your keyboard, not necessarily in the pad area. These buttons are for "All Strips Off" and "Panic" and should always be easily reachable.

----------------------------------------

5. Processing incoming messages

Go to your "Switch" layer, press the 6 buttons on the keyboard. Play some notes, move the pitch- and modulation wheels, step on the sustain pedal if you have one. Everything should be visible in the first monitor object on this layer. If not, check the Logic transport display and the "Click & Ports" layer.

5.1. "switch" messages

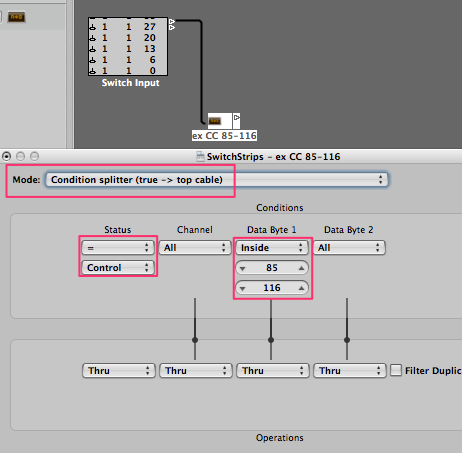
5.1.1.
Create a new transformer object, connect the first monitor to it, name the transformer "ex CC 85-116" (ex means extract) and configure it as below:
Screenshot%2020.10.13%2001:13.jpg

Function: From incoming data take just Control Changes 85-116 (our "select buttons") and spit them out at the upper outlet. Everthing else goes to the lower outlet.
5.1.2. Create a second transformer "only Value >0":
Screenshot%2020.10.13%2001:26.jpg

Function: Take only values above 0. Transform the message to a Program Change on channel 16 and take the incoming MIDI number minus 84 as outgoing MIDI value (the number->value routing is set by clicking on the vertical lines between the "Conditions" and "Operations" areas).
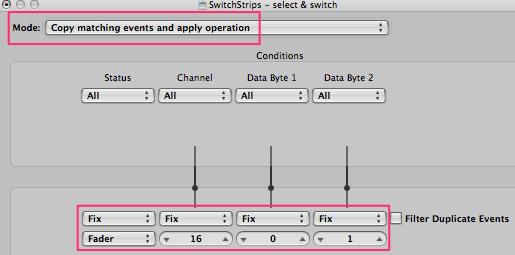
5.1.3. Create a third transformer "select & switch":
Screenshot%2020.10.13%2001:29.jpg

Function: Let incoming data pass and append a second message, type "Fader" on channel 16 with number 0 and value 1.
5.1.4. Create a Cable Switcher "Select Strip"
In the Inspector, set its Input to "Program, Channel 16, Range 0 32".

5.1.5. Create an Ornament object, name it "off" and make it as small as possible.

5.1.6. Create a Monitor object.

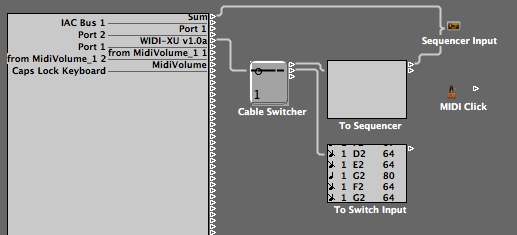
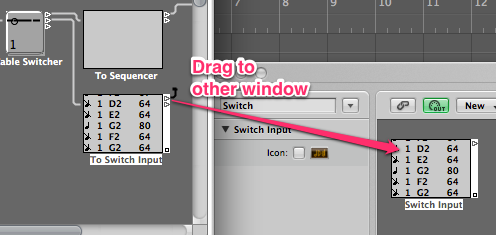
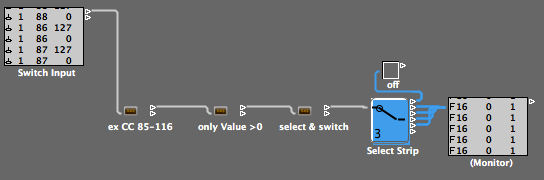
5.1.7. Arrange and cable everything as shown below:
Screenshot%2020.10.13%2001:34.jpg

Test the function:
At each press on one of the 4 "Selection Buttons" on your keyboard the Cable Switcher must switch to the appropriate number 1, 2, 3 or 4 and immediately afterwards a message "F 16 0 1" must appear in the right monitor after each press. Other messages like notes, pitchbend or other controllers are not visible in the right monitor.
(I think you are now familiar with the most common transformer settings. In following steps I will only deliver textual descriptions. Please note: I do not call the last two fields "Data Byte 1" and "Data Byte 2" but simply Number and Value.)


5.2. "All Strips Off" and "Panic"messages

5.2.1.
Transformer: "ex CC 119 (all strips off)"
Mode: Top Cable
Conditions: Control, number "= 119"
Operations: all thru
Function: CC 119 to upper outlet, other to lower outlet.

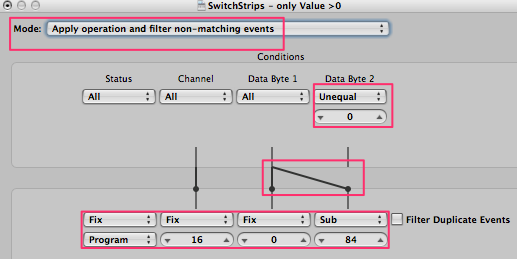
5.2.2. Transformer: "send stripoff"
Mode: filter non-matching
Conditions: Control, value "Unequal 0"
Operations: Fader, channel 16, number 0, value 2
Function: If incoming value is greater 0, send Fader 16 0 2, other incoming gets blocked.

5.2.3. Transformer: "ex CC 120 (all notes off)"
Mode: Top Cable
Conditions: Control, number "= 120"
Operations: all thru
Function: incoming CC 120 to upper outlet, other to lower outlet.

5.2.4. Transformer: "bang Panic"
Mode: filter non-matching
Conditions: Control, value "Unequal 0"
Operations: Meta, channel 1, number 99, value 0
Function: If incoming value is greater 0, send a bang to the next object. Other incoming gets blocked.

5.2.5. Create an Ornament object named "to all strips" and make it as small as possible.

5.2.6. Create a Monitor object.

5.2.7. Add all new objects to the existing patch as shown below:
Screenshot%2020.10.13%2002:42.jpg


Test the function:
Press your "All Strips Off" button on the keyboard (CC 119), the lower monitor must show "F 16 0 2" for each press and nothing when you release. When you press your "Panic" button (CC 120) the Monitor shows "M 1 99 0" and nothing on release. All other messages like notes, pitchbend etc. are also shown in this Monitor. Only the "Select" buttons do not appear here, because we extracted them already in the first row of the patch.
5.2.8. Fine if it works, but finally we do not send a "bang" message (Meta 1 99 0) to channelstrips for "Panic", this was only for testing. Actually we send note-offs to all channelstrips at once, for all notes on all MIDI channels. We are going to make a SysEx button and let it get banged by the "bang Panic" transformer.

We are now going to create 16x128 note-off messages in a SysEx button and need a plan. The "Note" event in the SysEx button is not very useful for that and we want another message anyway. We'll take the polyphonic aftertouch which is called Poly Pressure or P-Press in Logic. And we want to set a certain sort order to avoid confusion and make the following work easier.

Set Logic to the very first bar (position 1). Create a button, name it "Panic", set it's range to 0 0. Set it's output to "Sysex" and the editor will immediately pop up.

Click on "Create" and then on "Poly Pressure". You get something like this:
1 1 1 1 P-Press 1 E3 0

Scroll the note value to the lowest possible (C-2) and check the other columns. Your line should look like this:
1 1 1 1 P-Press 1 C-2 0

Copy/paste this line and, without deselecting the new line, scroll the note and the last digit of the position one step higher (note C#-2, pos 2). You get the following:
1 1 1 1 P-Press 1 C-2 0
1 1 1 2 P-Press 1 C#-2 0

Look at the highest note and position, select all, copy/paste and without deselecting scroll the note and last position digit of the top selected line one step higher than the highest you have (note D-2, position 3). You get:
1 1 1 1 P-Press 1 C-2 0
1 1 1 2 P-Press 1 C#-2 0
1 1 1 3 P-Press 1 D-2 0
1 1 1 4 P-Press 1 D#-2 0
(Nice, all pasted and still selected lines followed as you scrolled the first of them.)

Got the system? With "select all" - "copy/paste" -> "scroll note ..." - "scroll position ..." you can multiply your rows and and quickly get 128 of them in ascending order. Work slowly and be careful when the octave changes. Stop when you see this in the last line:
1 1 1 127 P-Press G-8 0
This is the last row for MIDI channel 1, with the highest note available.

We have now one set of all notes but only for channel 1. We got to make 16 channels out of that and continue slightly different:
Select all, copy/paste but now make the channel and the first position column one step higher. This gives you another 128 notes with 2 at the first position and for MIDI channel 2.

Repeat the process as before, always with all lines. And always change the channel and the first position. After just a few clicks you have all 16 channels.

First line: 1 1 1 1 P-Press 1 C-2 0
Last line: 16 1 1 127 P-Press 16 G8 0

You may need several attempts to get used to the system. Creating 2048 lines in a certain manner can easily go wrong, but fortunately it is pretty fast to do.

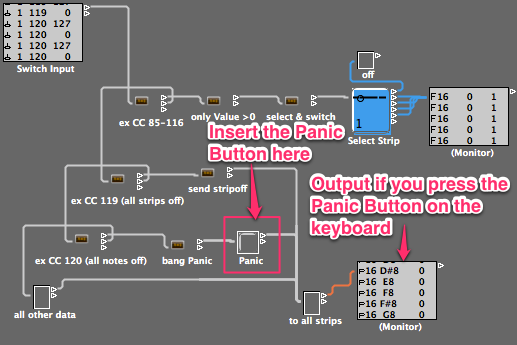
5.2.9. As usual, make sure that no line is selected when you close the editor. Then insert the Panic button in your patch:
Screenshot%2020.10.13%2004:31.jpg

Test the function:
Press the "Panic" button on your keyboard. The monitor object should show the last note-off data lines (P-Press, channel 16) . If this happens and the tests before were also successful, your input section is ready!
----------------------------------------

I'll stop here and wait.
Please tell me when you finished this part or ran into any problems.
 
Upvote 0
The AUDIOGROCERY Logic Mixer Snapshot Console environment tool is designed exactly for that and more...
Yes, Tangra, I thought about it. But does your tool do the following things which are crucial for live playing with many virtual instruments:

  1. Direct cabling to instruments to bypass Logic's "selected track" behavior.
  2. Disable plugins 1-16 when a channelstrip gets disabled.
  3. Send full note-offs (16x128) to a channelstrip when it gets disabled.
  4. Sound layering by keyboard splits on a per-channelstrip base.
  5. With channel-based keyboard splits, route Modwheel, Pitchwheel and Sustain by MIDI channel.
It doesn't, correct? You made it for another purpose. I am sure you could easily implement these functions but what you would add is all that Eduà needs ;)

What we are doing here in "tutorial style" is just a small patch for, I think, rather experimental music. It does not support presets but uses far less CPU power than Mainstage and, as we both know, Logic can switch faster.
 
Upvote 0
Hi Peter,
I do not have any free time to follow this post in details that's why I'll give some info and comments...
The Logic Mixer Snapshot is a massive Logic Template offering up to 96 pre-patched(direct cabling) mixer channels: 32 Audio Tracks, 32 Instruments,32 Auxes. It as a classic version of mixer snap shooting where you can store the snap shots and recall them in real time via midi messages. Preset Snapshot manager is supported so you can copy, move, update a given preset etc.

Anyway, re-reading all above in short, I guess you are talking about some kind of Logic "Main Stage" emulation so you can play live with previously prepared Instruments (inc channel strip FX etc). Just to say during Logic former v4-5 I was thinking about that seriously that's why I developed my AG. Midi Channel Switcher Environment tool (it was in 2003 or 2004).
Later I tried to patch that tool and create a mega direct cabled Environment "Logic Jammier Pro" with 256 pre-loaded Instruments (I had to invent some kind of Bank Switching as well for switching Instruments 0-127 Bank A and Bank B 128-256).
Right now I'm on a dead line with my new AG Channel Switcher PRO release (Scripter Plugin for Logic X) so I can not find my old records of the mega "Jammier Pro Template". What I found is the Midi Key Switcher Environment tool (the main part of the Jammier).
I just re-packed a Demo version so you can try it. Note, the Demo is full functional with 30 Note events pass elevation. After you play 30 notes it will stop so you can "Revert to Save" the Logic song and try it again if you want. There is a User Manual in PDF format in the pack.
I use a smooth channel/patch change here - same as in my Free Logic X Channel Switcher Scripter plugin - this is explained in the user manual key features too. By the way the hardware synths and Main Stage use such kind of smart switching - no hanging notes are guaranteed! The Logic Demo template below is set to "Autodemix by midi channel" so Logic is in live play mode. All tracks are set to ch.1-16 and are grouped (the "Record" button is enabled in that group only) so when you select any track all "R" will be ON - this is important for the live mode midi thru. Only 4 instruments are pre-loaded, you can load more at any time.

AG Midi Channel Switcher Demo - DOWNLOAD

ag_sw_enviro.png


Regards,

Ivan
 
Upvote 0
Back
Top